How To Fund CIPC Account In South Africa
“CIPC” means the Companies and Intellectual Property Commission; “CIPC account” means the virtual account created by the CIPC for a customer on the CIPC website following registration by such customer via the “Customer Registration” facility; “CIPC Bank Account” means the bank account held by CIPC at ABSA Bank.
How To Fund CIPC Account In South Africa?
Here is How To Fund CIPC Account In South Africa
What You Should Know About CIPC
So what is CIPC?
Good question.
CIPC stands for Companies and Intellectual Property Commission.
It’s an agency of the Department of Trade and Industry in South Africa.
It was established by the Companies Act, 2008 (Act №71 of 2008) as a separate legal entity to work as part of government within the public administration.
But as a separate institution outside the public service back in May 2011.
Before that, CIPC was called CIPRO.
CIPC is not only responsible for company registration but also co-operatives and Intellectual Property Rights (trademarks, patents, designs and copyright) and maintenance of the database.
I won’t get into more details about CIPC, but If you’re interested in learning more about its functions, click here.
Now you know about the CIPC, let jump into the details of how to register a company via their online platform.
Shall we?
Step #1: Claim Your Free CIPC Account
The first step is to get your unique CIPC username. To do that, you need to create a free account.username. To do that, you need to create a free account.
Note: If you already have a CIPC username, please skip this step.username, please skip this step.
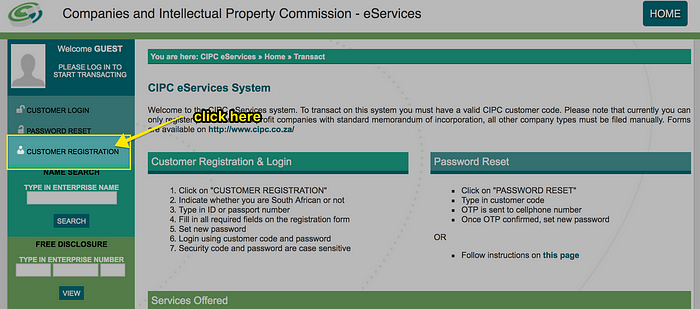
The first thing is to visit the CIPC e-service portal at e-service portal at https://eservices.cipc.co.za
Click CUSTOMER REGISTRATION on the left menu.
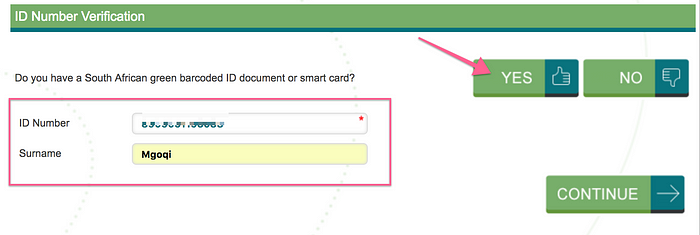
On the next step, you will need your South African ID number for verification.
Click either on the Yes or No radial buttons.
If you clicked Yes, type in your ID number and Surname.
And then click on CONTINUE.
If you selected No and do not have an ID number, type in your Passport Number and click on Continue.
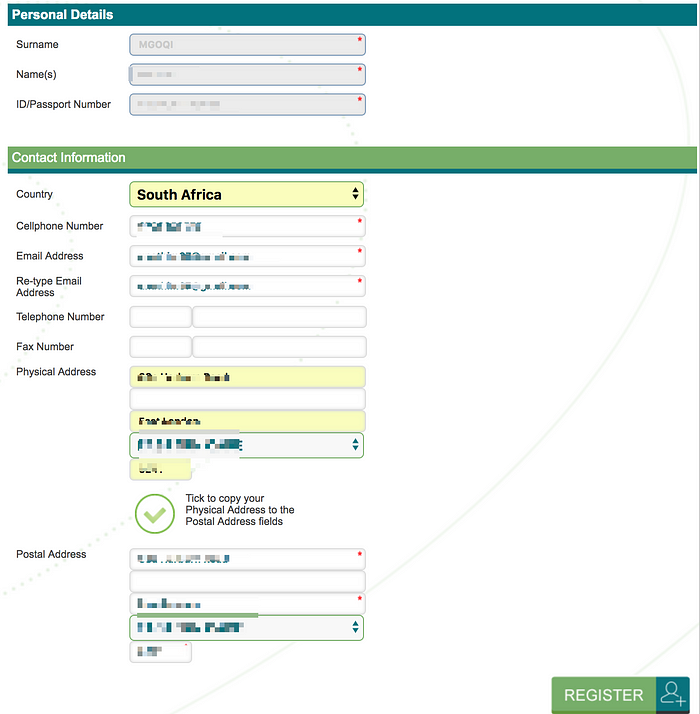
From the ID number you provided, the system will pre-populate your Surname, Name (s) and ID/Passport Number on the screen
Fill in the required fields (highlighted with a red an asterisk (*)) as shown below and click on Register.
The fields you have to fill are your:
- Country
- Cell Phone Number
- Email Address
- Physical and postal address.
The system will then verify the info you provided.
If there is any problem or missing information, an error message will display in red, showing what needs to be solved.
If necessary, correct the fields showed and click on “Register” again.
You’re only allowed to have one customer code per ID number.
If you completed all required fields and selected Register, you will receive the below message.
CUSTOMER CODE REGISTERED!
Your new CIPC customer code has been sent to your cellphone and email address. Click continue below to assign a password to your customer code.
Customer Code: X1234

Click continue to assign a password.
Type in a password, confirm the password and type in the security question. Confirm that all details are correct, and click on UPDATE.
Note: your password must contain:
- Minimum of 8 characters
- At least 1 UPPERCASE letter
- At least 1 lowercase letter
- At least 1 number
- Special characters are optional
- Only these characters are allowed: @$=!#%
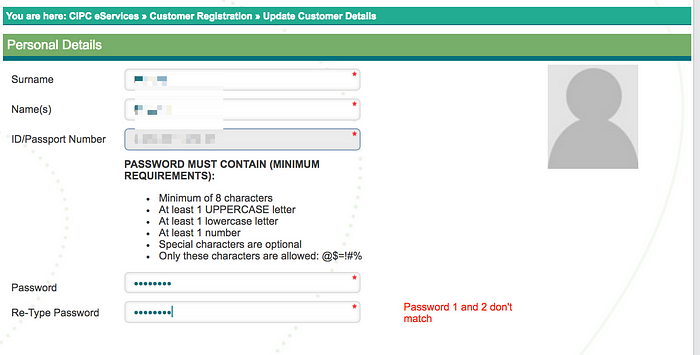
Now click the UPDATE button.
You’ll get a response as shown below…

Click on the CONTINUE button to move onto the next step.
Step #2: Deposit Money into Your CIPC
You’ve registered your account and have a CIPC username.
So what’s next?
You’ve to deposit money into the CIPC account. If you don’t, you won’t be able to able to proceed.
If you try, this is an error you’ll get:
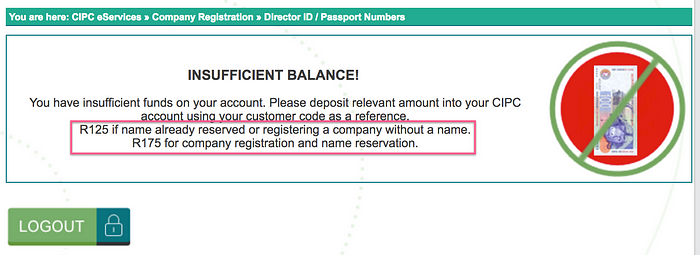
INSUFFICIENT BALANCE!
You have insufficient funds on your account. Please deposit the relevant amount into your CIPC account using your customer code as a reference.
R125 if a name already reserved or registering a company without a name.
R175 for company registration and name reservation.
So much do you need to deposit and how?
You need to have R175 (R50 for company name reservation and R125 for company registration).
And please note:
You need to use your CIPC username as a reference.
That is important. It will make it easier for CIPC staff members to allocate the funds to your account.
So where can you get the CIPC banking details?
Simple
Click TRANSACT on the top right corner of your screen and look for a square labelled BANKING DETAILS.
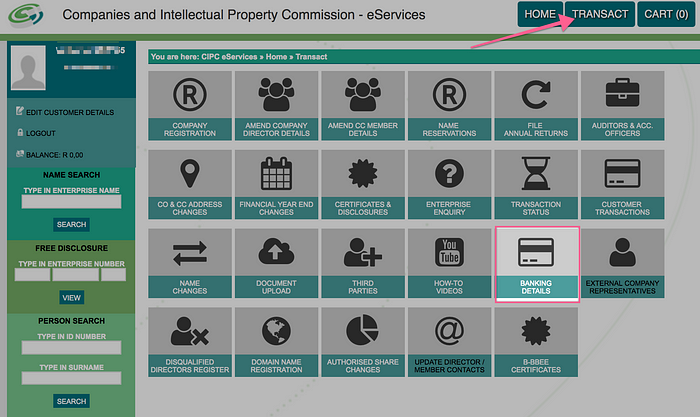
And here are the banking details (at the time of writing this article). Remember to use your CIPC USERNAME as your payment reference.

Once you deposit funds into the CIPC account, your account BALANCE will reflect on the left side of the screen.
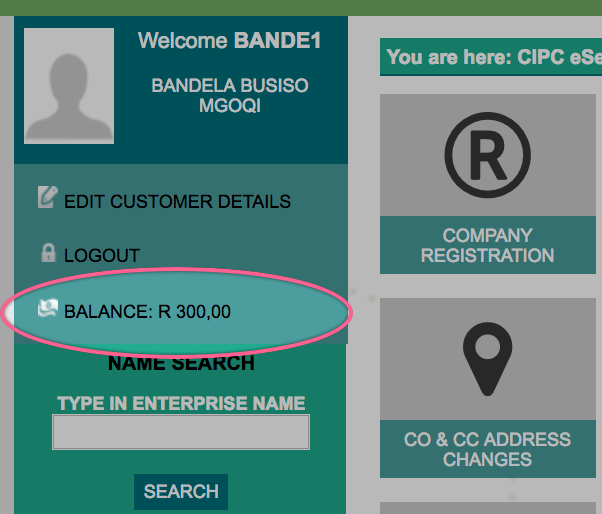
Now you’re ready to move to the next step… i.e. reserving your company name.
Step #3: Reserve your company name
You’ve registered a customer code, right?
Deposited money into the CIPC account.
So what’s next?
To reserve your company name.
And it’s the first step in registering your company.
But keep in mind:
You can register a company without reserving a company name first.
But I prefer to reserve the company name before I go ahead with registration. So it’s your choice
Head over to https://eservices.cipc.co.za/ and log into your account.
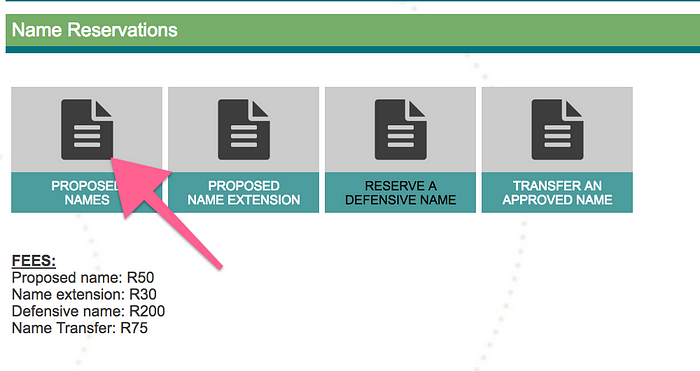
Click TRANSACT on the top right corner and click NAME RESERVATIONS ( as shown below).
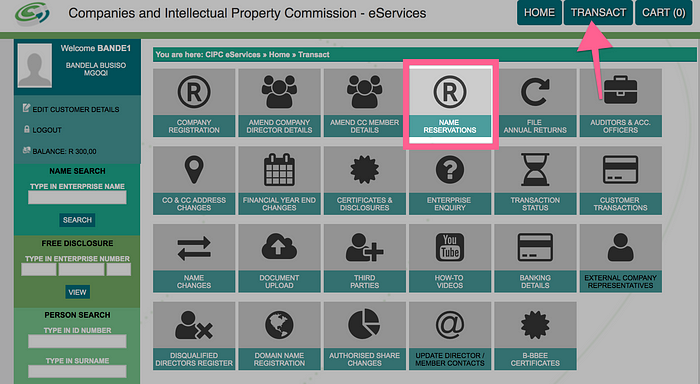
Click on PROPOSED NAMES.
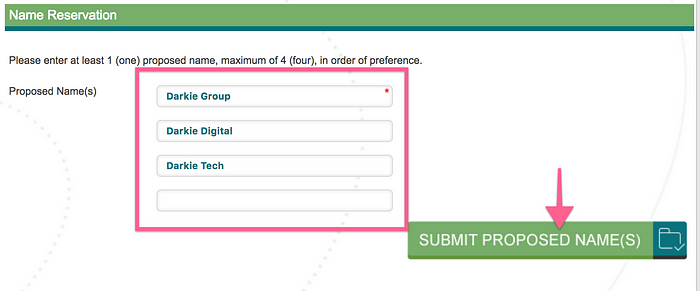
Enter at least one or a maximum of four proposed names for your company.
The name should be in the order of preference.
Click on SUBMIT PROPOSED NAME(S).
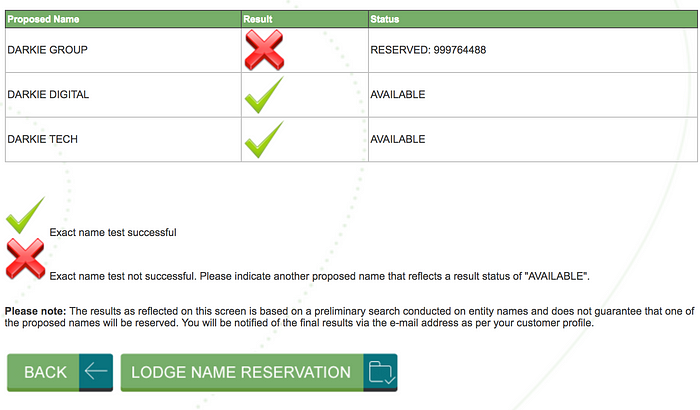
You will then get results, showing if the exact name test was successful or not.
A name test is whereby the system checks if there are no other companies with the same name you want to register.
If the name you want to register is taken, there will be a RED X. If it’s available, there will be a GREEN tick next to it.
For example:
If you look at the results below, Darkie Group has a red cross.
That means the name is not available for registration.
Now you have two choices:
Either click on BACK and propose another name and add a different name.
Or…
Click LODGE NAME RESERVATION.
The system will submit the first name available for reservation. Here, DARKIE DIGITAL.
Once you click LODGE NAME RESERVATION, You will get a message that the proposed name (s) has ) has been lodged, and you will also get a tracking number. Click on either BACK TO NAME RESERVATIONS or HOME.

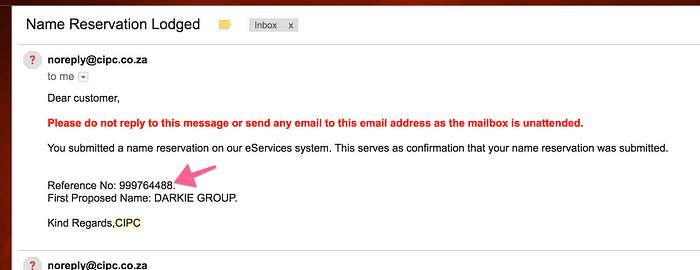
CIPC will also email you a confirmation of your company name reservation with a reference number.
Please keep the reference number in a safe place (or archive it).
You will need it later when lodging your company application.
For guidance on the service delivery standards for name reservations, checkout CIPC service turnaround times
Step #4: Complete your company registration by following these simple steps
Did you do everything I showed you above?
If yes, let’s dive in to complete your company registration.
Step #1: Choose the company type
Log into your CIPC account and click TRANSACT on the top right menu.
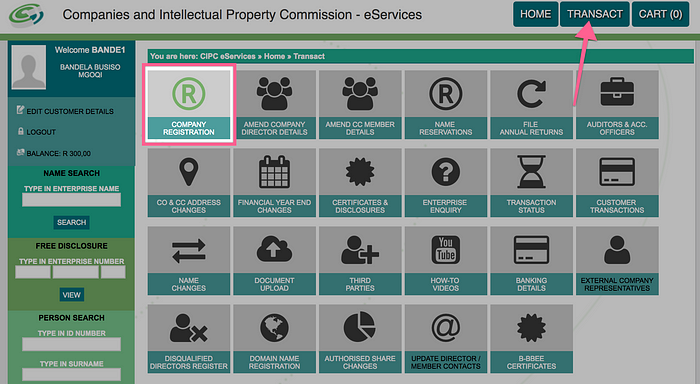
On the field titled TYPE OF COMPANY, choose the company you’re registering.
Choose a private company (if you’ll be running the company for profit)
or
choose NPC — for a Non-Profit Company.
For the sake of simplicity, I will cover PTY LTD in this article.

Enter the company director’s details.
If you’re the only one forming the company, enter your ID number, click the GREEN + button and click CONTINUE.
If there are over one director, type in (all) the director (s) ID or passport number (s), clicking the plus sign (+) after each director.
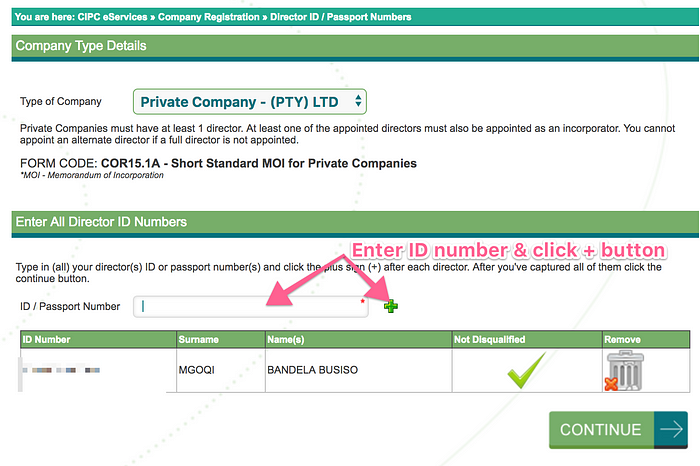
Then click CONTINUE.
Step #2: Add the incorporator
Now you need to choose an INCORPORATOR.
“What’s an incorporator,” You ask.
An incorporator is a person who registers a company but is not necessarily a director in the company.
At least one director you entered on the previous page can be appointed as both director and incorporator.
But remember:
You can also appoint an incorporator that is not a director.
To do that, click on ADD NEW INCORPORATOR below.
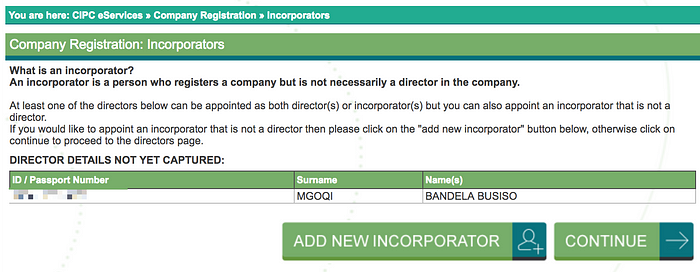
For example:
I am the director of this company (Darkie Group). But I am also an incorporator (I am registering the company).
So I don’t need to add a new incorporator.
Step #3: Capture Director’s Details
Next thing:
Add details of directors you’ve captured.
Click on EDIT (as shown on the screenshot below) to capture each of the director’s details.
NOTE: Directors cannot share email addresses and cell phone numbers.
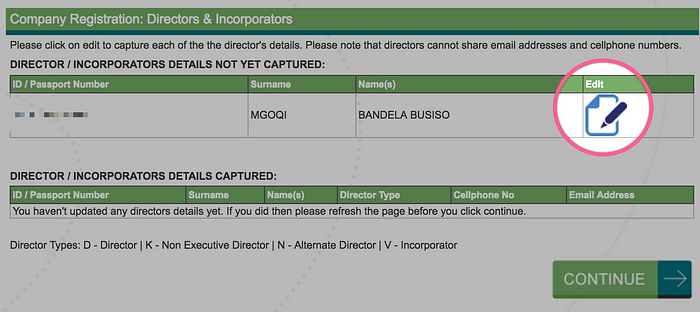
Now, choose the director type.
You’ve three options:
Director
This is a director who will be an employee of the company and be part of the day-to-day operations.
This person has a specified decision-making role as director. E.g. Managing director, director of finance, marketing, operations e.t.c Read more here
Non — Executive director
A Non-executive director is NOT an employee of the company and does not take part in the day-to-day management.
He is usually involved in planning and policy making. And sometimes included to lend his status or prestige to the firm because of his standing in the community.
Want to learn more about the non-executive director? Click here
Alternate Director
An alternate directory is a director available to the company temporarily, to stand for an elected director at a meeting of the board of directors.
He can only go to such meetings if the company:
- MOI (memorandum of incorporation) allow such an arrangement, and
- Other elected directors of the firm do not object. Read more here
Ok, now you’ve got a better understanding of the different directors.
It’s time to move to the next step…
Choose the director you’re editing on the DIRECTOR TYPE field.
Fill in all the required details as shown below:
- Surname and name,
- Country of origin,
- ID/Passport number,
- Director status,
- Appointment date (date appointed as a director of the company),
- Date of birth and cellphone number,
- Email, physical and postal address.
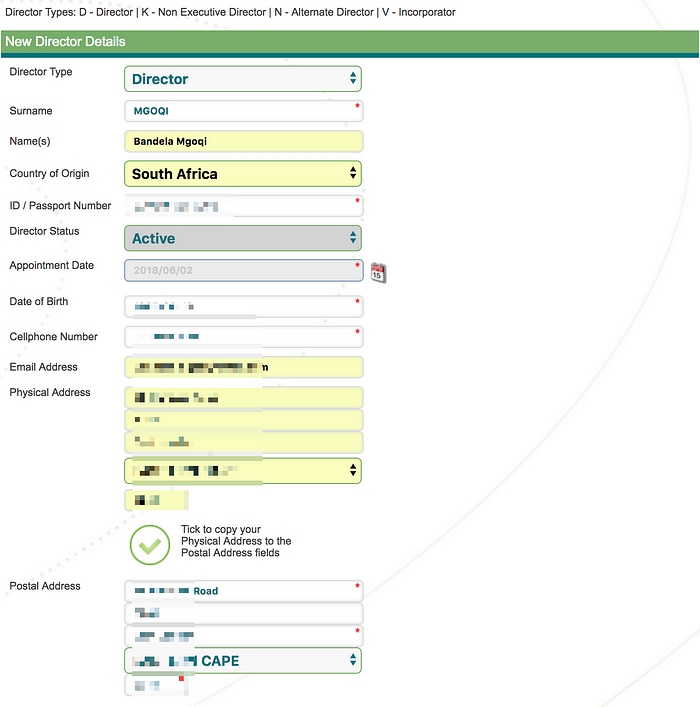
If you’re also an incorporator of the company, choose yes and click SAVE to save the director’s details.

Once you’ve saved the details, you will then see all the details captured (as shown on the screen below).
Click CONTINUE

Step #4: Capture the details of the company
The next thing to do is to capture details of the company you are registering.
Now, choose the Financial Year End of the company.
“But what is this financial year end I am talking about?” — You ask.
Great question!
Financial year end is an accounting period that can start on any day of a calendar year but has twelve consecutive months (52 consecutive weeks) at the end of which account books are closed, profit or loss is computed, and financial reports are prepared for filing. source
For example:
I chose February as a financial year end for the Darkie Group.
That means the company’s accounting period will be from 1st March of this year to 28 February of the following year.
Remember:
You can choose any other month.
Now choose the number of AUTHORISED SHARES.
And the question is…
What are authorised shares?
Authorised Shares are the shares of stock a company can issue to its shareholders. At first, the number will be specified in the MOI, but it can be changed later.
Authorised shares are all the shares that have been created in a company.
Once the shares are issued to shareholders, they become issued shares. Therefore, to be validly issued, the shares must first have been created or authorised.
In an article by entrepreneur mag, Christina from Norton Rose Fulbright states that:
“The number of authorised shares is set out in a company’s memorandum of incorporation. In order to issue authorised shares, the board of directors of the company must pass a resolution to that effect. The new shareholder is then entered into the company’s register of members, and the company creates a share certificate evidencing the issue, and gives it to the new shareholder. The issue must also be entered into a separate register. A company’s memorandum of incorporation may set out additional requirements for issuing shares.”
Clear?
Now back to where we were…
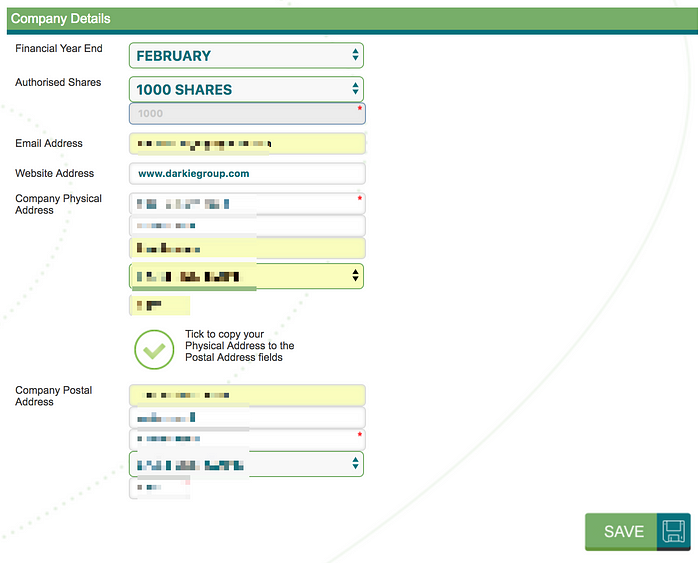
Enter all the required company details:
- E-mail and website address,
- Company physical address,
- And postal address
And click SAVE.
Name Reservation
Moving on to name reservation.
Now you will have three options presented to you, namely:
- Apply for a name as part of this process;
- Use a name that has already been approved;
- Register a company using an enterprise number as the name.
In this step, we will use option 2 — We already have an approved name.
Click on USE A NAME THAT HAS ALREADY BEEN APPROVED.

Enter your reservation number (tracking reference number you received via your email).
Click CONTINUE.

You will now see company and director details you captured on the previous steps.
Check if the details are correct.
Click on MODIFY COMPANY DETAILS if you need to edit either the company details or the director details.
If everything is correct, click on LODGE COMPANY.
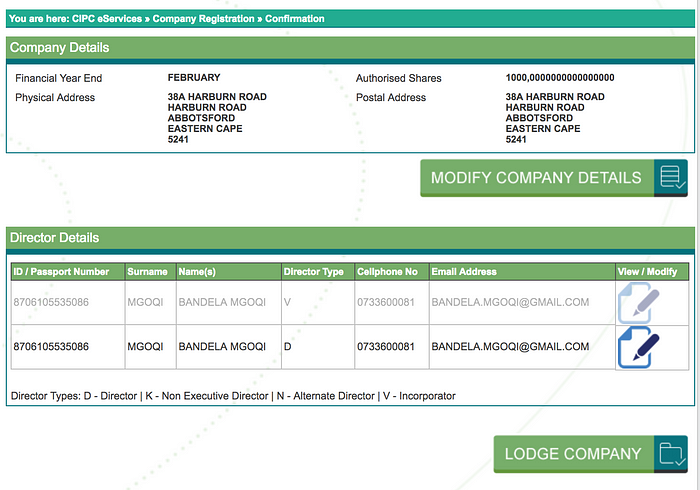
After lodging the company, you’ll get the response as shown below…

And boom!
You are done.
Complete this step, or they will not register your company.
Wait…
You are not done yet. You need to send supporting documents to complete the process
